Translate

Showing posts with label Cricut. Show all posts

Sunday, November 1, 2009

Two for One Challenge

 
I made this card with 2 challenges in mind.  The sweet little bird on a pumpkin is a free digital image from Nina May of There's Magic in the Air.  Nina taught me how to download and adjust a digital image.  I am also using this for a new color challenge, over at Play Date Cafe.  The colors are orange, yellow and dark brown.  

The products I used for this card are as follows. The beautiful designer paper is K &Company Brenda Walton Mira, you can't see the pretty shiny gold trim in this photo, it is gorgeous paper.  I used DCWV Heritage textured cs in brown, a vellum flower I made on the Cricut, I embossed with a Sizzix texture plate and cut and embossed with Spellbinders Labels 8.  The orange cs was from a sale.  This was a fun but really challenging exercise for me.  I would have to say color is my weak point in papercrafting so I am happy to be learning more at Play Date Cafe.  And I am also new to digital art, Nina at There's Magic in the Air has already helped me there, now I just need to master some coloring techniques.  Hope you enjoyed this, thanks for looking.  ~Diane

Just Us Girls challenge # 5 card


This is my entry for the 5th Just Us Girls Challenge.  This week they have challenged us to create a holiday card designed to present a photo.  This is a special Wild Card Challenge with a little something for everyone who plays.  You will have to go to their site to check it out!  I used clear polyester to make this card which is 5 x 7.  I used metallic blue card stock to cut the word Joy with my Cricut Plantin Schoolbook cartridge.  The holly leaves were cut on green and red metallic card stock with Cricut Stretch Your Imagination.  I found Rachael Ray in a magazine.  I hope you can see it well enough.  The J and 2 cut outs of holly are on the front, the OY is on the inside and I put a large holly leaf next to the Y for a signature.  Hope you enjoy, thanks for looking.  ~Diane 

Monday, October 26, 2009

Challenge Card for Just Us Girls


I made this card for a new challenge blog I recently found through Mona at Cupcake Creations. I even like the name of it "Just Us Girls" challenge. This weeks challenge is to add a 3D flower to your project. This is a card my friend Michelle asked me to make for her (multitasking) ha ha. I made my flower out of vellum on my Cricut. I get these amazing vellum colors from PaperandMore. I put seed beads in the center. I used Apricot Appeal, and the patterned paper is from Memory Boutique. I used the Martha Stewart lace punch on the bottom, and this is a
5 x 7 card. And I found the velvet ribbon on sale at JoAnns. I hope you like it
and thanks for looking. ~Diane

Saturday, October 24, 2009

Play Date Cafe


This is my entry for the Play Date Cafe color challenge. It reminds me of what Autumn in Michigan sometimes looks like. I had a tough time photographing this. I am working on a greatly needed new set up for photography. I don't know if you can see it, I used the Crystal Effects to layer the leaves for a more dimensional look. I used Core'dinations on the brown tree and leaves and Cuttlebug folder Snowflakes and Swiss Dots. I cut the tree, pumpkin and leaves from Cricut Stretch Your Imagination. I added some Dazzling Diamonds glitter to the snowflakes. Not sure if you can see it, I used a flourish Clear stamp with Stazon white opaque ink to add just a hint of wind to the picture. I must say this was a lot fun to make and the colors really challenged my imagination. Stop over to the Play Date Cafe and see what the designers made.Below is the color challenge. Thanks for looking. ~Diane

Sunday, October 18, 2009

Christmas Cards and gift tags


These are some Christmas cards I worked on this weekend. I bought the lovely digital image of the chandelier from Kaboodle doodles, it is called Pink and Black. It also comes with some lovely designer paper, not shown here. This is some of my card stock stash from DCWV. I printed the image onto the designer paper, then I cut and embossed it with my Spellbinders Labels 8 Nestabilities, the matching gift tags were cut and embossed with my Deckled Mega Rectangles Nestabilities. The green and red metallic foil card stock I used for the holly leaves was a find from last year at the Dollar store. I cut them with the Cricut Stretch Your Imagination cartridge. The leaves came out so nicely, I ran back on Sunday to see if I could grab some more. Luckily I was able to snatch up a few sheets, the green is now gone. I also bought some blue and red. Not sure yet what I will do with the blue, but I'm sure you will see it here when I do. I decided to try to be more creative in my photography, so I added the branch of berries to make it look more festive. I like the way it came out. I am also working with a homemade light box so I think my photo's are a bit brighter. Thanks for looking and thanks for all of your kind comments. I sincerely do appreciate it. ~Diane

Thursday, October 15, 2009

From Complicated and time consuming to simple and easy.

This is made with the DCWV THE SWEET STACK and vellum from Paper and More center flower cut with Cricut Accent Essentials cartridge,Spellbinders Fleur de Lis Pendant Shapeabilities, Spellbinders Deckled Mega Rectangles Nestabilities, small flower punched with Stampin Up punch, thank you from Stampin Up and satin ribbon.
More of the DCWV THE SWEET STACK card stock, vellum Happy Birthday printed on the computer, Princess does not show up well, but the word is made of rhinestones. Balloons made with Cricut Walk in my Garden, the crowns were made with the Sizzix embossing plate on Core'dinations card stock that I cut and sanded, then added glitter to the centers.
This cupcake was made by using my Cricut Walk in my Garden, the flower pot, I used a corner rounder on the bottom edges. The circles were punched with an EK Success punch, I used the Souffle pens to add the sprinkles. The card stock is from DCWV The Sweet Stack .
More DCWV Sweet Stack card stock and a ribbon.
So I went from complicated and time consuming to very simple and easy in these cards. I hope you enjoy, thanks for looking. ~Diane

Sunday, October 4, 2009

CLEARLY AUTUMN


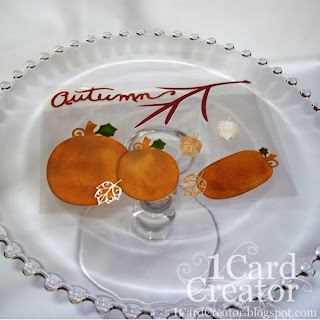
The smell of Autumn is in the air. The trees are beginning to shed their leaves, everyone is busy putting the Halloween decorations up. So to celebrate Autumn, my favorite time of year, I made this card on clear polyester film. I made all the pieces with my Cricut Stretch Your Imagination cartridge. The pumpkins were cut from More Mustard Stampin Up, the leaves are done with Core'dinations Whitewash. I added some gold ink to the pumpkins, I like the effect. The tall pumpkin lying on its side is actually on the inside of the card, to be used as the signature plate. Thanks for looking~Diane

Monday, September 14, 2009

FUSSY FUSSY CARDS


I've been busy all day working on these cards. They are so fussy and they do take quite a bit of time to cut, emboss, stamp and layer together. I don't know if you can see from the picture, but I made them with clear Mylar. Actually the Mylar has quite a bit more visual clarity to it than the acetate I usually use. I also used the brightly colored vellum from Paper and More. I used the Spellbinders Fleur de Lis Pendant and the Petite Ovals Nestabilities . The ribbon trim took forever to get in place, but it is worth it, because it really lends a rich look to the cards. I have found that the Fleur de Lis Pendant die can be a little fussy at times, but the Spellbinders site recommends that you add a piece of wax paper between the die and your card stock or vellum. That helps the problem of trying to remove the cut outs from the die, but I still have a problem getting the die to cut in the inside square. I have found 2 tricks that work for me that I will share. I take a thin piece of computer paper, cut it to the small size square, and place it behind the inner square only. I also have a magnet that is cut to the width of the plate. So I can run it through once in one direction and to run it in the other direction I only have to turn the magnet 1/4 turn. I'm making these as challenge gifts, I thought it would be cute to send them my $100 card! Lol. So girls if you see the color you want put your dibs on it quick! I have the hot pink I used for the Spellbinders contest already cut out, but not assembled as yet. And I have 1 more to make tomorrow, not sure what color that will be. I'm leaning towards the orange, I have another one of those pretty orange vellum flowers from the Cricut left over. I hope you are all enjoying your day. Thanks for looking ~Diane

Friday, September 11, 2009

SYMPATHY CARDS


I promised I would post some pictures later today, so here they are. Sadly 3 of my girlfriends have asked me for sympathy cards in the last 2 weeks. I will let Michelle pick her two, then I will list the others in my shop. This is a lovely Stampin Up set, Close as a Memory. I have had it for almost a year and this is the first time I have used it. The image has a watercolor effect, and my watercolors were a little too bright! I stamped the image in Mellow Moss SU, ivory and olive (I think) are Stampin Up. I should say I know for sure they are Stampin Up, I am just unsure of the names of the colors. I used the Spellbinders Labels 8 Nestabilities and the Spellbinders Deckled Mega Rectangles Nestabilities. I stamped one in black ink, and the other three I used the black embossing powder, I like that better. I glued Cricut flowers to one, used a shimmery watercolor paint on another, used my Aqua painter and some Stampin Up ink on another, and my 2 way glue pen and glitter on another. Well I hope you like these. Thanks for Looking, ~Diane

Thursday, September 10, 2009

MY CREATIVE PROCESS

This is what the finished cards look like.
These are all of my creative stumbles, failed attempts, none of these would work for me.

I am getting ready to start up in the card club again this year. I dropped out last year and gave it a break so I am excited to get back to it again. So much inspiration! We do a card swap when we meet, you make however many cards all the same, and you leave with the same number of cards, 1 from each player. It is so much fun, but I am having a hard time getting back into the swing of the 4 x 5 card format. I have been making the 5 x 7 cards for the last year and it gives me so much more room to create. I finished my cards, but I feel bad, they are not my best. I just couldn't seem to get what I wanted on to the paper.
I bring this up because a friend of mine asked me the other day "how long does it take you to make a card?" I tried to explain to her the physical making is not what takes time, it's getting the idea. Once I have the idea it's easy peasy!
For the swap I had this great idea to use some of my tie dye card stock. I cut some vase's with my Cricut and and some vellum flowers. I put these real pretty 1/2 pearls I found in the center. I don't like it, the vases are too big and they look dumb with the flower. Forget the vases, I'll just use the flowers. I cut some shapes with my new Spellbinders labels 8 die (one of my winnings from the Spellbinders contest). I embossed my cardstock with the Cuttlebug folder, then I decided to run through some stick and peel gold foil to add the bird as an element. I cut out all the birds and stuck them on the card stock and then I embossed the bird onto the card stock. Ok so I like the look of this but not the color of the card stock I chose. Change colors, I then use the Swiss dots Cuttlebug folder to emboss the frame I made with the labels 8. Then I decide the brown card looks too plain. I use a Sizzix embossing plate on that. But to emboss the front I needed to change the direction of how the card opens. Looks good, with the labels 8 rounded corners I decide it would look nice if I punched the corners round too. Ok I like that too. I add a ribbon, ok I guess. It needs something, and it's not the pretty vellum flower. The flower is too big! Ok go through all my embellishments to see what would look good. Problem, I now need to find something large enough to hide where I peeled the flowers off of the ribbon. Ok these pretty metal flowers are in the right size and scale (somewhat) but the centers are plain. Go through my bling and see what I can find. I tried rhinestones in red then green, nope! I see, the bright yellow seed beads! I put it on and say I'm done, but I'm just not that happy with the results. It's not ugly, I'm not fishing for someone to say oh, it's nice, I know it's ok. I just know I had something in my head and I could not translate that to the paper and it disappointed me. So that's what I mean when I say it's the idea that takes time. Am I the only one who creates cards like this? What do you do when you stumble and just can't seem to get it right?
Thanks for reading ~Diane

Tuesday, August 11, 2009

Come join us for some fun!

This is the card I made for the Tuesday Challenge.


Here's the recipe for this card: The fabulous card stock background is from DCWV NANA'S Kitchen. The flower pot is barely bannana SU, and has a sheet of vellum embossed with a Sizzix plate over the top. I molded the flowers, ladybugs and flowerpot around various items on my desk to give them shape. I added dimensional foam to the flower pot, and the ladybugs bodies. I had some chunky glitter I found on clearance at JoAnns a while ago, I added it to the black bodies of the ladybugs and used it for the centers of the flowers. The ladybug eye's are from dollar store. Oops, I almost forgot, the flower pot, flowers, stems, and ladybugs were all cut with my Cricut Walk in my Garden.

Well the Spellbinders Pendant Contest deadline has come and gone. Good luck to all of us who entered! I entered 3 projects which I can't show you yet, but here is one of my rejects that didn't make the cut and get entered.


For this card I used the Spellbinders Fleur de Lis , I added a few rhinestones and an embellishment to the center. I wanted to enter it into the contest, but my family voted it down and chose another for me to send in. Thanks for looking ~Diane


Tuesday, May 26, 2009

A few cards I've been working on


I've been busy thinking up new cards for my friends and my daughter. I am still trying to organize my stamps. I photographed all of my Stampin Up sets on Friday and I somehow lost them in my computer. I have been loading pictures incorrectly so I figured out what I was doing wrong there. I would keep pictures on my camera card so that every time I loaded new pictures into my HP Image Zone, the program would recognize them as new and make back ups and copies, and then when I would edit them I would get more copies. So now I have it set up to delete the photo's from my camera card after I transfer them. I thought I was keeping the photo's in My Pictures so I deleted the photo's in the HP program. Guess what? That deleted my photo's in My Pictures too. Well the good part is that I found out that I have a back up so I found the photo's and I also found about 800 more copies of copies to go through and try to delete only the many duplicates. I am happy that I figured out the back up and how to recover from it. I will post a tutorial on spinner cards soon. Thanks for looking~Diane

Tuesday, April 28, 2009

Lauren's Wedding Shower Card


I used the Wonderful Wings stamp from Stampin Up to make this card, I never get tired of the beautiful butterflies in this set. I used chalk on the wings and a gold filigree pen on the body. I stamped the image on vellum, in white ink. I made this for a friends daughter, for a wedding shower, her wedding colors were sage green and pink. I used the Stampin Up sage shadow, with the new Pirroutte Pink (I love this color). Sorry I went crazy with the photo's, but I wanted to show how I cut about an inch and a half off the front bottom of the card. You can see the lace from the inside of the card when you close the card. I mounted the lace on a strip of pink and used double face tape to mount it to the white card. I saw this floral trim in the fabric section of JoAnns, and I had to get it. I hadn't planned out the card yet but I knew it was meant for a card, not a dress. Very well worth the 2.99 a yard price, I think it makes the card. I cut For Lauren with the Cricut Expression. I will try to post more often in the future, and thanks for looking.

Wednesday, April 15, 2009

Alchemy Special order request


Finally some sunshine! Would you believe the grass is already green in Michigan?
These are some special order cards I made for a fellow Etsian at Studio 79, she's a computer genius. If you are looking to set up a web site you have to check out her shop, I've added the link to her shop here. I had a lot of fun designing these cards, I was trying to capture her taste based on the MUM card she already purchased. But I really need to work on my photographing skills. I also wanted to make one card for entry into the Heart Hugs Designs Etsy inspired challenge. Card number 3 is the one I found my inspiration from the Etsy shop Make Mine Mud. I have a photo of the set of three garden stakesI used for the inspiration. The garden stakes look like the felt flowers I used with the Cricut cut out around it. The 1st 2 cards have some beautiful Spring Moss grosgrain ribbon that looks like paper in the photos. I do like working with ribbons, but I like to tuck them in behind the top layer of a card. I think it looks more professional if the ribbon does not show on the inside of the card. Sometimes if you have to wrap it around the card itself it can be hidden with an inside paper liner. I cut the letters for all of these with my Cricut Expression. This year I have been using more background papers in my cards. I found that when you buy a set the color combinations are already worked out for you, I like that. I would have to say that is where my creativity lacks the most. I have a hard time incorporating different color schemes into my cards, and the sets seem to address that for me. Well I hope she can find 2 of these she likes.

Wednesday, April 1, 2009

Mothers Day card ideas


This was a very cool honor, one of my peers at etsy chose this card for a Mothers day treasury she put together. The treasury was chosen for the front page, which gives my shop more exposure. Thank you OhFaro, it truly was an honor to be chosen along with the other awesome crafters, my Mother would be proud of the company I keep. Here's a link to the treasury http://www.etsy.com/treasury_list.php?room_id=55112 Better yet, check out her shop, she has some awesome hair accessories made from vintage jewelry, here is her link:
I have been busily working on some Mothers Day cards for my shop. I thought I would share a few of them here. I was browsing through my Card Makers Sketch Book by Tanya Fox, and I found this idea for 3 cut sheets going in different directions. I bought these coordinating papers quite a while back, I thought they would really make it pop. I like how they came out but I had no idea how much work would be involved. I was surprised it took a lot more time than I expected. Cutting all the pieces and gluing them on, gluing the letters on (in a straight line)
was more challenging than I imagined. I cut the letters with the Cricut expression, and I used the negatives too. I like the way the lavender stripes show through the word MUM. I ordered a new product called Flower Soft, it just arrived. I will have to tell you what I think of it. I can't wait to start trying it out. Take care.

Monday, March 30, 2009

Basket weave tie dye, candelabra and Birthday card


Sorry no posts, I had the flu। I wanted to update you with a few more cards I finally finished. The 1st card I made with some of the tie dye paper I made. I cut it into strips and did a basket weave. I used the Cricut to cut the scalloped border. I added one of my StampinUp Wonderful Wings butterflies that I stamped with white ink on vellum, then chalked. I had a white flower
that I chalked to match, added a little glue and glitter to finish it off. Candelabra was stamped with the gold acrylic paint that is pretty liquid and then I used black opaque embossing powder. I like working with the thicker paint it gives it a different effect. I had some teardrop shaped rhinestones that I added for a splash of color. The Birthday card was for my daughter, I used
the Melissa Frances paper, ribbon and embellishments that I won from Paper Craft magazine. I really liked working with the set, that was a first for me. I liked that everything was in the same color family and I could mix the papers and not worry if it would look good. I used the vellum stickers from K&Company for the sentiment, I stuck it to a piece of blue card stock and then I dipped the edges in black ink. My daughter said she really liked the way it looked so professional. Have fun stamping this week, it's snowing here in Michigan! I can't wait for the warmer weather.

Saturday, February 28, 2009

Pop Up Card


Hello. I have some pictures of a card I made for a friend for her Mother in Law's 92nd Birthday. I will give you step by step instructions as I make another card similar to my friends. This is a beautiful pop out card that really wow's anyone you send it to. You can improvise with any color card stock or any object to put in it. I will give you some easy step by step instructions. I used all vellum butterflies to pop up on one of them, instead of the flowers. On one of these photos you will see one of the butterflies.
-->
Instructions
Choose your cardstock, score, fold and cut to desired size. Do the same with another sheet of cardstock or heavy paper. (but do not use your bone folder on the crease of the inside card yet) Also fold your inner card in the opposite direction so the pretty stuff is on the inside. I like to pick something for the inside of the card with a matching theme. If you have a word window punch from Stampin Up you can close the inner card on its fold, and use the punch pushed up as far as it will go from the bottom of the card, find the halfway of the punch and make a punch (so when you open up the folded piece you removed it will be the same size as the window punch itself) Repeat from the top of the card. (picture) Or use an exacto blade to cut. With the pattern side facing up using a ruler score a line from the outside of the bottom slot to the top slot and repeat on the other side.(picture) Now you can bend the score lines so the inside of the card has a shelf. Now you can use your bone folder inside the card. I use two sided tape to attach the inside to the outside of the card. Now find some colorful cardstock and stamp it with flowers. Use different colors of cardstock and different sizes of flowers. You will need triple the amount of small flowers. Use black ink, and begin cutting out each and every flower (this
is the fun part). Use 3 large flowers to start, bend a corner on 2 of them, (picture) and use a glue dot to attach to the shelf.(picture) Now all you do is continue adding flowers to the flowers and build this out. TWO VERY IMPORTANT NOTES. Always be sure the glue dot is covered by the flower you are working on so that they don’t stick the card shut. And keep closing the card to make sure your flowers are on the inside and not creeping out. For the card front I added 2 flowers that I used the 2 way glue pen to cover and then added glitter and a rhinestone flower to the center from Joann's. I used my Provo Craft Cricut, with the Accent Essentials cartridge to cut frames, 1 regular and 1 shadow. I then glued and glittered them. For the finished card I used Die Cuts With a View (DCWV) Blossoms and Butterflies premium stack cardstock for the inside and outside of the card. I love the DCWV premium stacks, this one already had a lot of glitter detail on it. I used Stampin Up stamps; Doodle this, Delight in Life and Wonderful Wings for the vellum butterfly) thatI used white ink and Jacquard products powder on. I hope you try this and have fun with it like I did.
Thanks for looking.  ~Diane 
If you would like to leave a comment on this post it will be moderated and published within 24 hours.  I would love to see what you make.